A newsletter for Highmark Blue Shield providers in central Pennsylvania, the Lehigh Valley, northeastern Pennsylvania, and southeastern Pennsylvania
Issue 5, May 2024


Based on feedback from providers and their teams, we put together these tips to help providers and their teams complete transactions in Availity® easier and faster:
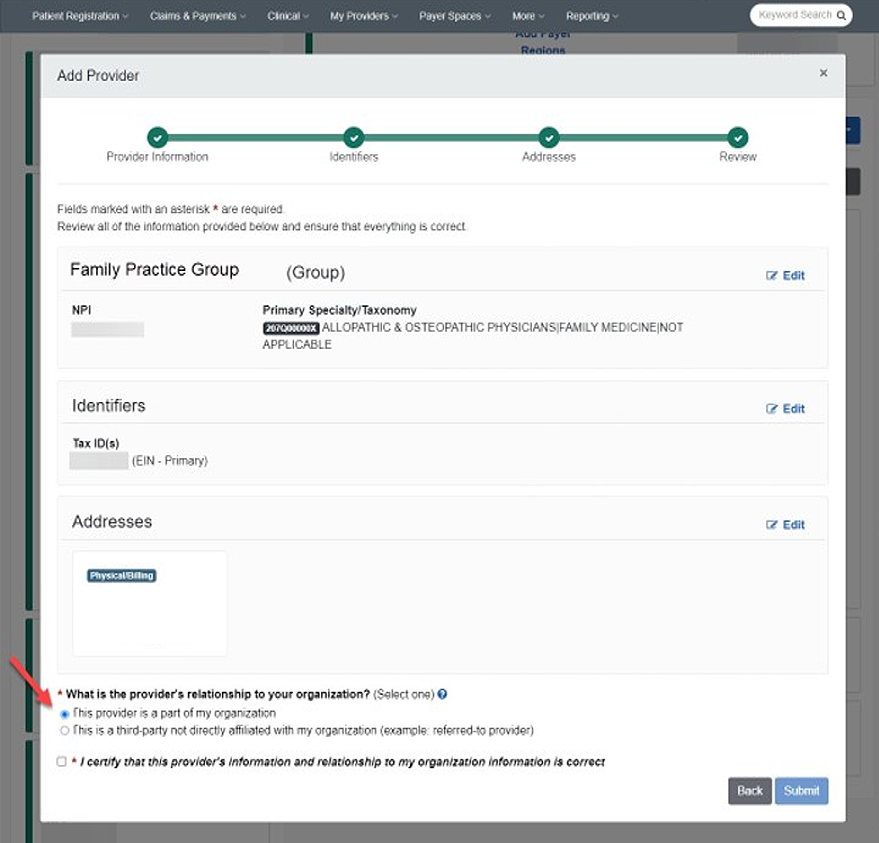
Highmark contracts with providers at the group level, so when adding “Providers” in Manage My Organization, be sure to list the Billing Groups — and not individual practitioners. By listing all the Billing Group providers in your organization right from the start, you’ll make submitting transactions in Availity easier and faster.
Remember to ensure that the radio button, “This provider is part of my organization,” is selected.
Inputting all Billing Groups may take some time and effort on the front end — depending on the size of your organization — but it pays off as you go forward.
If you’ve already done this, congratulations! If you still need to add more providers, use the Manage My Organization guide on the Provider Resource Center (PRC).
This guide walks you step-by-step on how to add all the Billing Groups in your organization, as well as making updates in the future.
If you’re a solo practice — and there is only one practitioner in the organization — you would still need to add your practice NPI. This may be the same as your individual practitioner NPI... unless you have a different NPI for the practice itself.
Once all the Billing Groups have been added, then you don’t have to worry about inputting them later or wondering why a particular Billing Group provider isn’t showing up when you’re trying to complete a transaction.
Since Highmark contracts and reimburses at the Group level, always use the appropriate Billing Group NPI — and not the individual practitioner NPI — for all Availity transactions, including Eligibility and Claim Status.
Here’s an example of how to properly complete the provider selection for a transaction within Payer Spaces:
.In Payer Spaces, for larger organizations, just use the Select an Organization dropdown, choose your TIN, and hit Submit. It’s the fastest way to generate a list of group NPIs within that TIN for your facility/practice.
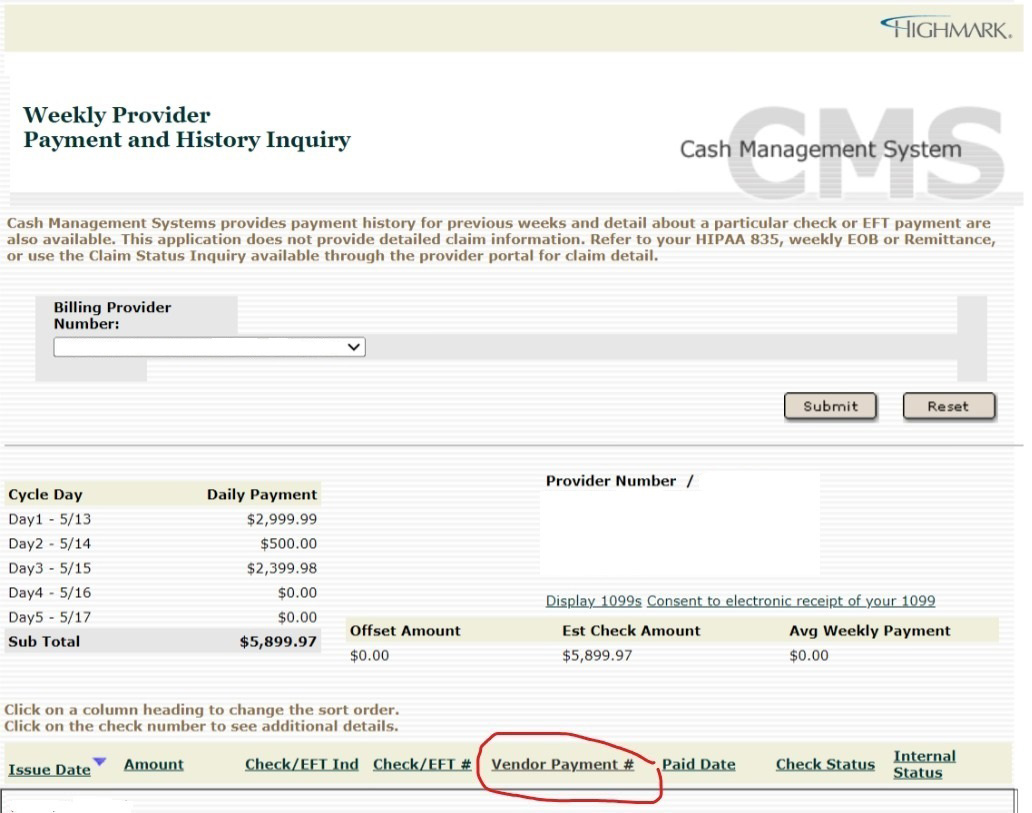
Before you can view your remittances in Remittance Viewer, you must complete a short registration to validate that you have been reimbursed by Highmark. It will ask you for a Highmark check number.
Since Highmark partners with PNC Healthcare, powered by ECHO Health to manage our payments, please use the ECHO Health draft number when registering. Do not use the Highmark check number. (We know this is confusing and are currently working on an update to make this clearer!)
In addition to the ECHO Provider Payments site, you can find the ECHO Health draft number for a claim (also called the Vendor Payment #) by going to PAYER SPACES > Cash Management > Vendor Payment#.